S3-Objektspeicher wie EL storage auf Basis von Wasabi kann außer mit entsprechenden Anwendungen zusätzlich als (Netz-)Laufwerk verbunden werden.
In der EBERTLANG-Knowledge Base findet sich bereits eine Auflistung an Anwendungen die eine Verwendung als Laufwerk unterstützen:
EL storage-Bucket als lokales Laufwerk unter Windows/MacOS einbinden
Zusätzlich oder alternativ kann man dies zudem mit dem Open Source-Tool Rclone zusammen mit WinFsp einfach umsetzen. Nachfolgend wird die Einrichtung unter Windows beschrieben.
Installation
Zunächst lädt man Rclone herunter und entpackt den Inhalt des Archivs z.B. nach
C:\rclone
Als nächstes lädt man WinFsp herunter und installiert es. Als nächstes öffnet man eine Eingabeaufforderung für die weiteren Schritte.
Erst-Einrichtung
Damit man Rclone nutzen kann, muss zunächst eine Konfigurationsdatei mit mindestens einem Speicheranbieter angelegt werden. Der Vorgang ist einfach:
rclone.exe config
Es startet ein Assistent, der einen durch die Einrichtung führt. Anbei in Kurzform die vorzunehmenden Eingaben:
- n) New remote
- <Einen Namen, z.B. “el-storage”, eingeben>
- 4 / Amazon S3 Compliant Storage Providers including AWS, Alibaba, Ceph, Digital Ocean, Dreamhost, IBM COS, Minio, SeaweedFS, and Tencent COS
\ “s3” - 13 / Wasabi Object Storage
\ “Wasabi” - 1 / Enter AWS credentials in the next step
\ “false” - <Den Access Key eingeben>
- <Das Secret eingeben>
- 1 / Use this if unsure. Will use v4 signatures and an empty region.
\ “” - 3 / Wasabi EU Central endpoint
\ “s3.eu-central-1.wasabisys.com” - location_constraint> eu-central-1
- 1 / Owner gets FULL_CONTROL. No one else has access rights (default).
\ “private” - Edit advanced config?
n) No (default) - y) Yes this is OK (default)
- An dieser Stelle kann mit “s) Set configuration password” ein Passwort zum Schutz der Konfiguration gesetzt werden. Der Hintergrund dazu ist, das in der Konfigurationsdatei alle Daten inkl. der Zugänge im Klartext hinterlegt sind. Planet man allerdings die automatisierte Nutzung von Rclone kann das Konfigurationspasswort hinderlich sein.
- q) Quit config
Ein Mitschnitt einer Einrichtung in voller Länge kann man nachfolgend einsehen (Anklicken zum Aufklappen):
rclone config – Ausgabe
c:\rclone>rclone.exe config
No remotes found - make a new one
n) New remote
s) Set configuration password
q) Quit config
n/s/q> n
name> el-storage
Type of storage to configure.
Enter a string value. Press Enter for the default ("").
Choose a number from below, or type in your own value
1 / 1Fichier
\ "fichier"
2 / Alias for an existing remote
\ "alias"
3 / Amazon Drive
\ "amazon cloud drive"
4 / Amazon S3 Compliant Storage Providers including AWS, Alibaba, Ceph, Digital Ocean, Dreamhost, IBM COS, Minio, SeaweedFS, and Tencent COS
\ "s3"
5 / Backblaze B2
\ "b2"
6 / Box
\ "box"
7 / Cache a remote
\ "cache"
8 / Citrix Sharefile
\ "sharefile"
9 / Compress a remote
\ "compress"
10 / Dropbox
\ "dropbox"
11 / Encrypt/Decrypt a remote
\ "crypt"
12 / Enterprise File Fabric
\ "filefabric"
13 / FTP Connection
\ "ftp"
14 / Google Cloud Storage (this is not Google Drive)
\ "google cloud storage"
15 / Google Drive
\ "drive"
16 / Google Photos
\ "google photos"
17 / Hadoop distributed file system
\ "hdfs"
18 / Hubic
\ "hubic"
19 / In memory object storage system.
\ "memory"
20 / Jottacloud
\ "jottacloud"
21 / Koofr
\ "koofr"
22 / Local Disk
\ "local"
23 / Mail.ru Cloud
\ "mailru"
24 / Mega
\ "mega"
25 / Microsoft Azure Blob Storage
\ "azureblob"
26 / Microsoft OneDrive
\ "onedrive"
27 / OpenDrive
\ "opendrive"
28 / OpenStack Swift (Rackspace Cloud Files, Memset Memstore, OVH)
\ "swift"
29 / Pcloud
\ "pcloud"
30 / Put.io
\ "putio"
31 / QingCloud Object Storage
\ "qingstor"
32 / SSH/SFTP Connection
\ "sftp"
33 / Sugarsync
\ "sugarsync"
34 / Tardigrade Decentralized Cloud Storage
\ "tardigrade"
35 / Transparently chunk/split large files
\ "chunker"
36 / Union merges the contents of several upstream fs
\ "union"
37 / Uptobox
\ "uptobox"
38 / Webdav
\ "webdav"
39 / Yandex Disk
\ "yandex"
40 / Zoho
\ "zoho"
41 / http Connection
\ "http"
42 / premiumize.me
\ "premiumizeme"
43 / seafile
\ "seafile"
Storage> 4
Choose your S3 provider.
Enter a string value. Press Enter for the default ("").
Choose a number from below, or type in your own value
1 / Amazon Web Services (AWS) S3
\ "AWS"
2 / Alibaba Cloud Object Storage System (OSS) formerly Aliyun
\ "Alibaba"
3 / Ceph Object Storage
\ "Ceph"
4 / Digital Ocean Spaces
\ "DigitalOcean"
5 / Dreamhost DreamObjects
\ "Dreamhost"
6 / IBM COS S3
\ "IBMCOS"
7 / Minio Object Storage
\ "Minio"
8 / Netease Object Storage (NOS)
\ "Netease"
9 / Scaleway Object Storage
\ "Scaleway"
10 / SeaweedFS S3
\ "SeaweedFS"
11 / StackPath Object Storage
\ "StackPath"
12 / Tencent Cloud Object Storage (COS)
\ "TencentCOS"
13 / Wasabi Object Storage
\ "Wasabi"
14 / Any other S3 compatible provider
\ "Other"
provider> 13
Get AWS credentials from runtime (environment variables or EC2/ECS meta data if no env vars).
Only applies if access_key_id and secret_access_key is blank.
Enter a boolean value (true or false). Press Enter for the default ("false").
Choose a number from below, or type in your own value
1 / Enter AWS credentials in the next step
\ "false"
2 / Get AWS credentials from the environment (env vars or IAM)
\ "true"
env_auth> 1
AWS Access Key ID.
Leave blank for anonymous access or runtime credentials.
Enter a string value. Press Enter for the default ("").
access_key_id> xxxxxx
AWS Secret Access Key (password)
Leave blank for anonymous access or runtime credentials.
Enter a string value. Press Enter for the default ("").
secret_access_key> xxxxxx
Region to connect to.
Leave blank if you are using an S3 clone and you don't have a region.
Enter a string value. Press Enter for the default ("").
Choose a number from below, or type in your own value
1 / Use this if unsure. Will use v4 signatures and an empty region.
\ ""
2 / Use this only if v4 signatures don't work, e.g. pre Jewel/v10 CEPH.
\ "other-v2-signature"
region> 1
Endpoint for S3 API.
Required when using an S3 clone.
Enter a string value. Press Enter for the default ("").
Choose a number from below, or type in your own value
1 / Wasabi US East endpoint
\ "s3.wasabisys.com"
2 / Wasabi US West endpoint
\ "s3.us-west-1.wasabisys.com"
3 / Wasabi EU Central endpoint
\ "s3.eu-central-1.wasabisys.com"
endpoint> 3
Location constraint - must be set to match the Region.
Leave blank if not sure. Used when creating buckets only.
Enter a string value. Press Enter for the default ("").
location_constraint> eu-central-1
Canned ACL used when creating buckets and storing or copying objects.

This ACL is used for creating objects and if bucket_acl isn't set, for creating buckets too.

For more info visit https://docs.aws.amazon.com/AmazonS3/latest/dev/acl-overview.html#canned-acl

Note that this ACL is applied when server-side copying objects as S3
doesn't copy the ACL from the source but rather writes a fresh one.
Enter a string value. Press Enter for the default ("").
Choose a number from below, or type in your own value
1 / Owner gets FULL_CONTROL. No one else has access rights (default).
\ "private"
2 / Owner gets FULL_CONTROL. The AllUsers group gets READ access.
\ "public-read"
/ Owner gets FULL_CONTROL. The AllUsers group gets READ and WRITE access.
3 | Granting this on a bucket is generally not recommended.
\ "public-read-write"
4 / Owner gets FULL_CONTROL. The AuthenticatedUsers group gets READ access.
\ "authenticated-read"
/ Object owner gets FULL_CONTROL. Bucket owner gets READ access.
5 | If you specify this canned ACL when creating a bucket, Amazon S3 ignores it.
\ "bucket-owner-read"
/ Both the object owner and the bucket owner get FULL_CONTROL over the object.
6 | If you specify this canned ACL when creating a bucket, Amazon S3 ignores it.
\ "bucket-owner-full-control"
acl> 1
Edit advanced config?
y) Yes
n) No (default)
y/n> n
--------------------
[el-storage]
type = s3
provider = Wasabi
access_key_id =
secret_access_key =
endpoint = s3.eu-central-1.wasabisys.com
location_constraint = eu-central-1
acl = private
--------------------
y) Yes this is OK (default)
e) Edit this remote
d) Delete this remote
y/e/d> y
Current remotes:

Name Type
==== ====
el-storage s3

e) Edit existing remote
n) New remote
d) Delete remote
r) Rename remote
c) Copy remote
s) Set configuration password
q) Quit config
e/n/d/r/c/s/q> q
Ein erster Test
Um zunächst ausprobieren zu können, ob der Zugriff gelingt, kann man erstmal den Inhalt auflisten lassen:
rclone.exe lsd el-storage:
Die Ausgabe kann wie folgt aussehen
c:\rclone>rclone.exe lsd el-storage:
-1 2021-09-20 20:37:45 -1 HV02
-1 2021-07-14 12:21:25 -1 backupassister01
-1 2021-07-19 21:12:46 -1 backupassister02
-1 2021-08-20 12:03:34 -1 el-storage
-1 2021-09-20 21:10:20 -1 hv02-bac
-1 2021-09-22 22:55:30 -1 hv02-restic
-1 2021-09-25 20:48:00 -1 hv02-restic2
Bemerkung: Der Doppelpunkt am Ende des obigen Befehls ist wichtig. Lässt man diesen weg, funktioniert der Aufruf nicht. Dieser dient bei Rclone als Trennzeichen zwischen dem Speicheranbieter und dem Bucket(name).
Bucket als (Netz-)Laufwerk verwenden
Hat soweit alles funktioniert, kann man ein Konto oder ein Bucket als Netzlaufwerk einhängen (mounten). Der Befehl dazu sieht wie folgt aus:
Konto
rclone mount <Remote>:/ W: --vfs-cache-mode full
Ein Beispiel:
rclone mount el-storage:/ W: --vfs-cache-mode full
Bucket
rclone mount <Remote>:<Bucket>/ W: --vfs-cache-mode full
Ein Beispiel:
rclone mount el-storage:el-storage/ W: --vfs-cache-mode full
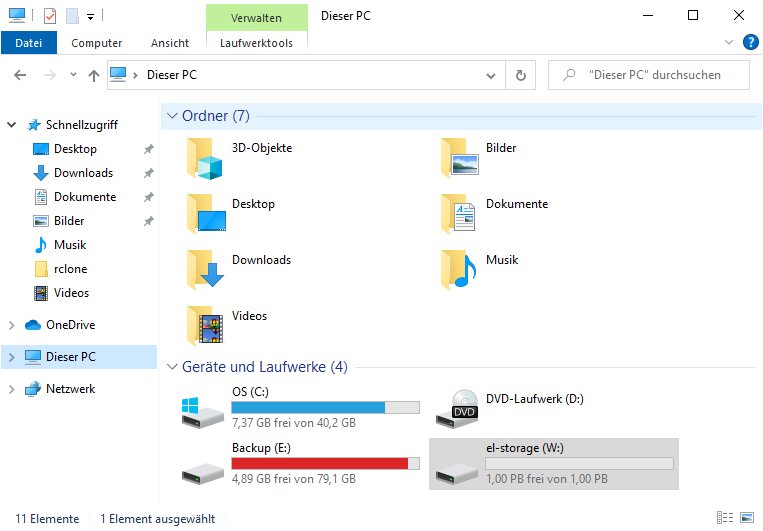
Sowohl in der Eingabeaufforderung, als auch im Windows-Explorer kann man nun auf das Laufwerk zugreifen:
Gezielt als Netzlaufwerk einhängen kann man durch das Hinzufügen des Parameters
--network-mode
Ein Beispiel:
rclone.exe mount el-storage:/ W: --vfs-cache-mode full --network-mode
Durch zweimaliges drücken von “Strg + C” in der Eingabeaufforderung in der Rclone gestartet wurde, wird das Laufwerk getrennt und der Prozess beendet.
Speicherort der Einstellungen
Rclone speichert per Default eine Konfigurationsdatei im Benutzerprofil des Anwenders, von dem es gestartet wurde. Der Pfad lautet:
C:\Users\%username%\AppData\Roaming\rclone
In der Datei “rclone.conf” sind alle Einstellungen vorhanden. Möchte man sowohl bei der (Erst-)Einrichtung, als auch später beim Aufruf von Rclone einen eigenen Pfad bzw. Namen für die Konfiguration angeben, so geht dies mit dem Parameter “–config”. Ein Beispiel:
rclone.exe --config "C:\rclone\el-storage.conf" lsd el-storage:
Die Konfigurationsdateien können einfach bearbeitet oder kopiert werden. So kann eine bereits vorhandene Datei als Vorlage dienen.
Grafische Oberfläche
Rclone kann viel mehr, ein näherer Blick lohnt sich. Wer lieber mit Hilfe einer grafischen Oberfläche arbeitet, kann ein Web-Interface starten:
rclone.exe rcd --rc-web-gui
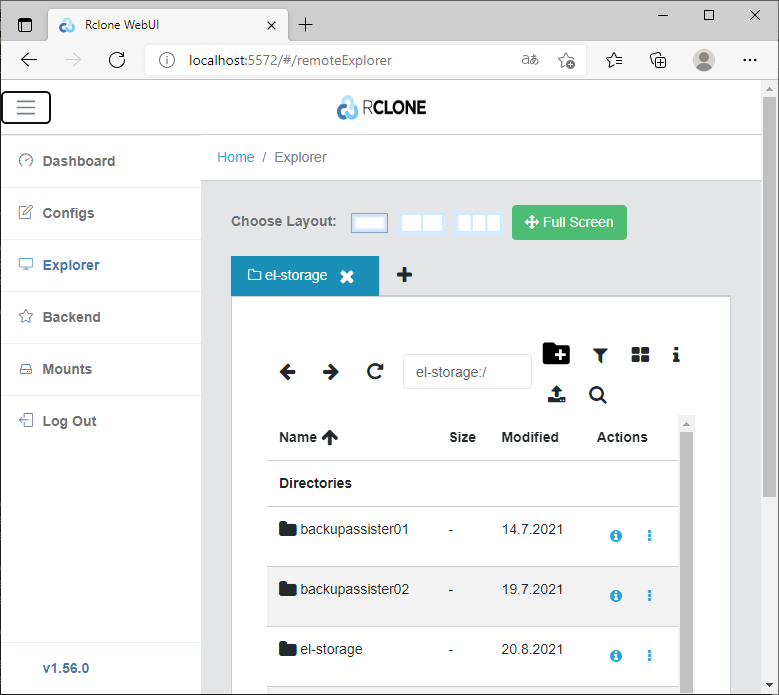
Einen Moment nach dem Start des Prozesses öffnet sich der Standard-Browser mit der entsprechenden Adresse:
Von hier aus können Konfigurationen erstellt oder geändert, auf vorhandene Remotes direkt im Browser zugegriffen oder Netzlaufwerke erstellt werden.
Wichtig: Die GUI ist noch Experimentell!
Benutzer einschränken
Soll derjenige, der Rclone verwendet auf ein bestimmtes Bucket eingeschränkt werden, so muss eine entsprechende Richtlinie bei el-storage bzw. Wasabi konfiguriert werden. Siehe dazu:
EL storage (Wasabi): Benutzer auf bestimmte Buckets beschränken
Quellen
Nakivo – Blog – A Guide on How to Mount Amazon S3 as a Drive for Cloud File Sharing

Verheiratet, Vater von zwei Kindern, eines an der Hand, eines im Herzen. Schon immer Technik-Freund, seit 2001 in der IT tätig und seit über 10 Jahren begeisterter Blogger. Mit meiner Firma IT-Service Weber kümmern wir uns um alle IT-Belange von gewerblichen Kunden und unterstützen zusätzlich sowohl Partner als auch Kollegen.
 XING
XING








Hallo Andy,
ich habe meinen S3 bucket in rclone konfiguriert. Das Kommando
.rclone sync -P . oliver:oliver/folder –s3-no-head
funktioniert, aber
.rclone mount oliver:oliver/ M: –vfs-cache-mode full –network-mode
bindet den Bucket nicht als M: ein. Was mache ich falsch?
Viele Grüße
Oliver
Hallo Oliver,
welches OS verwendest du?
Gibt’s irgendeine Fehlermeldung?