Kurz notiert, da ich die Tage darüber gestolpert bin als ich eigentlich etwas ganz anderes gesucht habe: In Audacity kann man eine Spur oder ein Projekt mit Hilfe von Textmarken nicht nur gut Dokumentieren sondern auch anhand dessen beim Export in einzelne Dateien trennen.
Als simples Beispiel lädt man einen Song in Audacity, fügt mittels
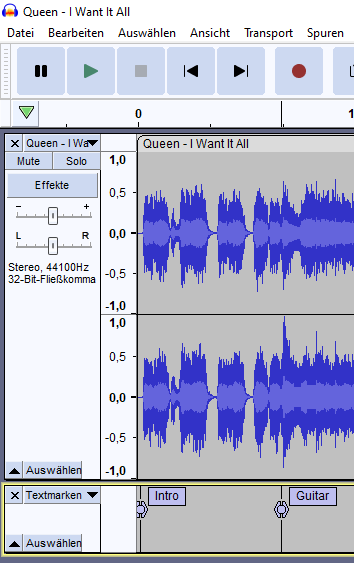
Spuren - Neu hinzufügen - Textspur
eine entsprechende Spur hinzu und schreibt dann an der jeweils passenden Stelle einfach drauf los:
Nun kann man unter
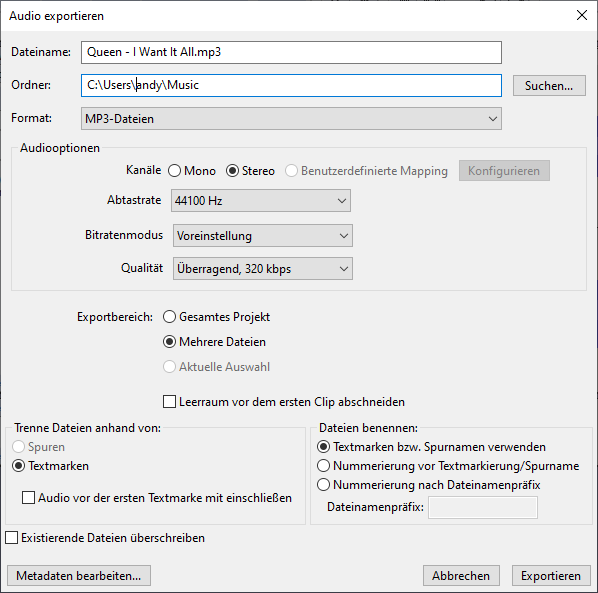
Datei - Audio exportieren
bei “Exportbereich” “Mehrere Dateien” anklicken und anschließend bei “Trenne Dateien anhand von:” “Textmarken” auswählen:
Auf diese Weise entfällt das man eine oder mehrere Spuren in einzelne Schnipsel aufteilen bzw. auftrennen und manuell abspeichern muss.

Verheiratet, Vater von zwei Kindern, eines an der Hand, eines im Herzen. Schon immer Technik-Freund, seit 2001 in der IT tätig und seit über 10 Jahren begeisterter Blogger. Mit meiner Firma IT-Service Weber kümmern wir uns um alle IT-Belange von gewerblichen Kunden und unterstützen zusätzlich sowohl Partner als auch Kollegen.
 XING
XING


Hallo Andy,
vielleicht kannst du mir bei einem echt nervigen Problem helfen, nämlich nach dem Rendern macht die Lautstärke in der gerenderten Spur irgendwann einen Sprung. Kannst du mir vielleicht sagen, woran das evt. liegt und wie man das abstellen kann!?
VG aus Aachen
Hallo Erwin,
dieses Verhalten hatte ich noch nicht, andererseits mache ich aktuell auch nicht sehr viel mit Audacity.
Wie sieht denn das Projekt aus? Länge, Workflow, etc. Vielleicht lässt sich das Ganze (bei mir) nachstellen.
Ist vielleicht sowas hier:
https://forum.audacityteam.org/t/rendered-track-increase-in-volume/72304
Oder was z.B. eine Suche auswirft:
“Audacity Volume Rendering Problem
When you encounter a volume problem after rendering a track in Audacity, it could be due to several factors. One common issue is that the rendered track might have a different volume level compared to the original track with effects applied. This can happen if the effects applied during rendering change the overall volume of the track.
To address this, ensure that the effects applied during rendering are not increasing the volume beyond the original level. If the rendered track is louder, you can use the Amplify or Normalize effects to adjust the volume back to the desired level. For example, you can use the Amplify effect by selecting the track, then going to Effect > Amplify and adjusting the dB level to decrease the volume.
Another approach is to check if the master fader in your project settings is set correctly. If the master fader is below 0 dB, it can affect the volume of the rendered track. Setting the master fader to 0 dB and adjusting the track faders to avoid clipping can help maintain the correct volume levels during rendering.
Additionally, if the volume issue persists, you can manually adjust the volume of the rendered track using the envelope tool in Audacity to ensure a consistent volume level throughout the track.
If you are still facing issues, consider checking the settings of the effects applied during rendering and ensure they do not inadvertently increase the volume of the track.
KI-generierte Antwort. Verifizieren Sie die Fakten.”